

Quick Answer
To layer living room lighting, combine three essential types: ambient lighting for general brightness, task lighting for activities, and accent lighting for visual interest. Place sources at different heights and give each layer independent controls. Warm-white bulbs and diffused light help create a comfortable atmosphere. Explore these ambient lighting ideas for additional inspiration.
7 quick steps to layer living room lighting
- Map your room: Identify seating, activity areas, furniture, and dark corners.
- Establish ambient lighting: Add a ceiling fixture or indirect floor lamp for broad illumination.
- Introduce task lighting: Position reading lamps beside sofas and chairs.
- Create accent lighting: Highlight artwork, bookshelves, or textured walls.
- Add decorative interest: Choose fixtures that complement the room’s style.
- Coordinate your bulbs: Start with warm-white LEDs around 2700K–3000K.
- Adjust each layer: Use compatible dimmers or separate switches to create different lighting scenes.
My practical starting tip
- Start with three sources: Try one ambient light, one reading lamp, and one accent light before buying additional fixtures.
- Test after sunset: Check brightness, shadows, and glare from your usual seating positions.
A living room can look beautiful during the day but feel uncomfortable after sunset. Often, the problem isn’t the furniture or wall color.
It’s the lighting arrangement. I’ll explain how to layer living room lighting using practical steps, simple placement rules, and flexible lighting combinations.
What Is Layered Living Room Lighting?
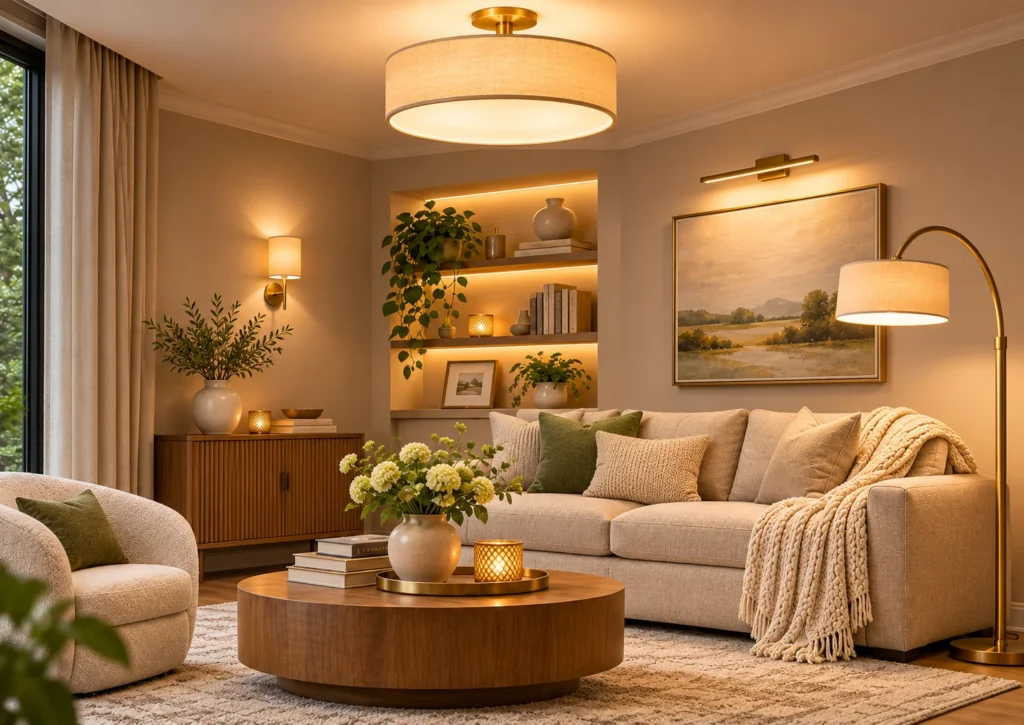
Layered living room lighting means combining different light sources to provide useful illumination, visual depth, and a comfortable atmosphere.
Instead of relying on one overhead fixture, you distribute light across several locations and heights.
A successful lighting plan usually combines these four functions:
- Ambient lighting: Provides general brightness for moving around and using the room.
- Task lighting: Illuminates specific activities such as reading, writing, or crafts.
- Accent lighting: Draws attention to artwork, plants, architectural features, or shelving.
- Decorative lighting: Adds visual personality through attractive fixtures and shades.
Decorative lighting often overlaps with the other three layers. A statement pendant, for example, may also provide ambient illumination.
The Cooper Lighting guide to layered residential lighting explains how different lighting functions work together.
Why Is Layering Better Than One Ceiling Light?
Layering gives you greater control over where light appears and how bright it feels. It also helps prevent one overly bright fixture from dominating the room.
Consider the difference between these arrangements:
- Single-light room: One overhead fixture illuminates the center but may leave seating areas uncomfortable.
- Layered room: A ceiling light provides background brightness while lamps illuminate individual activity zones.
- Flexible layered room: Separate controls let you adjust the atmosphere without changing furniture or fixtures.
I prefer evaluating the room from the sofa rather than the doorway. Lighting should feel comfortable where people spend their time.
How Do You Layer Living Room Lighting Step by Step?
Start by understanding how the room functions, then build each lighting layer around those activities. These seven steps work for both new decorating projects and existing rooms.
Step 1: Map Your Living Room Activities
Before purchasing fixtures, identify what happens in each part of the room. Your lighting arrangement should support those activities.
Draw a simple floor plan and mark the following:
- Main sofa and occasional chairs.
- Reading or hobby areas.
- Television and fireplace locations.
- Artwork, shelves, and decorative features.
- Windows and existing electrical outlets.
- Walkways and poorly illuminated corners.
Next, identify which locations need focused light. A reading chair and a decorative console rarely require the same brightness.
Step 2: Create a Comfortable Ambient Lighting Base
Ambient lighting provides the general illumination that helps people navigate and use the living room. It forms the foundation of your lighting plan.
Choose one or more broad light sources depending on the room’s size and layout.
- Flush-mount fixtures: Useful for rooms with relatively low ceilings.
- Semi-flush fixtures: Provide general lighting with additional decorative detail.
- Recessed lighting: Offers a discreet appearance when installed and positioned correctly.
- Uplighting floor lamps: Reflect light from walls or ceilings to create softer illumination.
- Wall sconces: Supplement general brightness without taking up floor space.
Avoid choosing the strongest possible bulb simply because the room seems dark. Glare and poorly distributed light can make a bright room uncomfortable.
For more overhead fixture options, see these ceiling lighting ideas for living rooms.
Step 3: Add Task Lighting Where You Need It
Task lighting directs illumination toward activities requiring better visibility. A reading lamp is the most familiar living room example.
Position these fixtures near the activity instead of attempting to brighten the entire room.
- Beside the sofa: Use a table lamp or adjustable floor lamp for reading.
- Next to an armchair: Direct the light toward a book or hobby surface.
- Near a small desk: Choose a lamp with an adjustable arm or head.
- At a game table: Provide enough light to see the playing surface without direct glare.
For reading, I suggest starting with a lamp slightly beside or behind your shoulder. Adjust the head until the light reaches the page comfortably.
The bulb should remain outside your direct line of sight. Explore this floor lamp placement guide for additional positioning ideas.
Step 4: Introduce Accent Lighting for Visual Depth
Accent lighting highlights selected objects or architectural details. It creates visual interest without needing to illuminate the entire room.
Choose one or two focal points rather than highlighting every decorative object.
- Artwork: Use a picture light or carefully aimed directional spotlight.
- Bookshelves: Add concealed LED strips or miniature display lights.
- Textured walls: Use indirect wall washing to emphasize the surface.
- Decorative niches: Install subtle lighting within suitable recesses.
- Plants: Position a soft decorative light nearby without overheating foliage.
Accent lighting should create contrast without becoming distracting. Strong reflections on framed glass can defeat its decorative purpose.
Step 5: Add Decorative Lighting at Different Heights
Decorative lighting contributes to the room’s appearance and may also support general illumination. Think about how each fixture looks both on and off.
Mix light sources at different heights to avoid concentrating every bright point near the ceiling.
- High level: Pendants, chandeliers, and ceiling fixtures.
- Middle level: Wall sconces, shaded table lamps, and adjustable reading lights.
- Low level: Concealed shelf lighting or carefully placed decorative lamps.
These aren’t mandatory height categories. They’re a useful way to notice whether your room needs lighting closer to the furniture.
Choose compatible finishes and proportions rather than matching every lamp exactly. A brass wall sconce can work beautifully beside a ceramic table lamp.
For additional wall-mounted options, explore these stylish wall sconce ideas.
Step 6: Coordinate Bulb Brightness and Color
Use lumens to compare brightness and Kelvin to compare white-light color. Both affect how your lighting layers perform.
For many relaxing living rooms, 2700K–3000K provides a useful warm-white starting point.
- 2700K: Warm, slightly golden illumination for relaxed evenings.
- 3000K: Warm white with a somewhat cleaner appearance.
- 3500K: More neutral-looking light for multipurpose spaces.
- 4000K: Cooler white light that some people prefer for detailed activities.
Match color temperatures where you want a consistent appearance. Different temperatures can still work when they serve clearly separate purposes.
Check the Energy Star brightness guidance when comparing bulb output.
Step 7: Give Each Lighting Layer Independent Controls
Separate lighting controls make your living room useful throughout the day. You can adjust the mood without switching every fixture on together.
Consider preparing three simple lighting scenes:
- Everyday conversation: Moderate ambient brightness with softly illuminated seating.
- Reading time: Lower background illumination and a focused reading lamp.
- Movie night: Dim indirect lighting that avoids television reflections.
Use compatible dimmers, separate switches, or smart lighting controls. The Energy Star smart lighting guide explains common control features.
Not every LED works with every dimmer. Follow manufacturer compatibility instructions before purchasing or installing controls.
How Bright Should Each Living Room Lighting Layer Be?
Each lighting layer needs a different amount and distribution of light. Start with the activity and fixture position rather than applying one brightness setting everywhere.
The following examples are practical shopping starting points, not prescribed lighting standards.
| Lighting Layer | Example Source | Starting Output | Main Goal |
|---|---|---|---|
| Ambient | Ceiling fixture | 800–1,600 lumens per suitable source | Broad illumination |
| Task | Reading lamp | 450–800 lumens | Comfortable reading |
| Accent | Picture or shelf light | 200–450 lumens | Highlight features |
| Decorative | Small shaded lamp | 200–450 lumens | Soft atmosphere |
Actual usable illumination depends on lamp distance, beam direction, shade material, and surrounding surfaces. Two bulbs with identical lumens can create different results.
What Does CRI Mean for Living Room Lighting?
The Color Rendering Index (CRI) describes how accurately a light source shows object colors compared with a reference source.
A CRI of at least 80 is a reasonable interior-lighting starting point. Consider 90 or higher when artwork, wood, and fabric colors are especially important.
The U.S. Department of Energy’s lighting guidance explains the relationship between light output, electricity use, and color appearance.
Where Should You Place Lights to Avoid Glare and Shadows?
Position lights according to the places people sit, walk, and look. Glare often results from visible bulbs or fixtures aimed toward the eyes.
Check these locations before finalizing your arrangement:
- Near sofas: Use shaded lamps with bulbs hidden from seated view.
- Beside reading chairs: Aim the light at the page rather than toward the reader.
- Across from televisions: Avoid lamps that create noticeable screen reflections.
- Near mirrors: Test reflections from the normal viewing position.
- Along walking routes: Keep lamp bases and electrical cords clear of traffic.
For table lamps, the bottom of the shade near seated eye level is a useful starting point. Check your actual furniture and sitting position before deciding.
This table lamp placement guide explains how to assess height, proportion, and positioning.
How Do You Layer Lighting in Different Living Room Layouts?
The same lighting principles apply across room sizes, but fixture placement should change with the layout. Avoid copying a lighting arrangement without considering your own furniture.
Small Living Rooms
Small living rooms benefit from flexible fixtures that don’t crowd the available floor area. One well-placed lamp may perform more than one function.
- Use a diffused ceiling fixture for general illumination.
- Position a slim reading lamp beside the main sofa.
- Add plug-in wall lighting when floor space is limited.
- Use concealed accent lighting rather than oversized decorative fixtures.
Large or Open-Plan Living Rooms
Large rooms need lighting organized around separate activity zones. A single central fixture may leave distant seating areas underlit.
- Give each seating group its own useful light.
- Combine ceiling fixtures with table or floor lamps.
- Highlight selected artwork or display areas.
- Use separate controls for different room zones.
Living Rooms Without Ceiling Lights
You can create layered lighting without installing overhead fixtures. Combine portable lamps with indirect light reflected from walls or ceilings.
- Place a shaded or upward-facing floor lamp in a suitable corner.
- Add an adjustable reading lamp beside the main chair.
- Position a table lamp across the room for balance.
- Use a suitable plug-in accent light for a decorative feature.
This combination is particularly useful in rented homes. It allows meaningful lighting improvements without permanent electrical changes.
Living Rooms With Televisions
Television areas need carefully controlled background illumination. Bright sources reflected in the screen can distract from viewing.
Use low-intensity indirect light away from prominent screen reflections. Test every lighting source while seated in your usual viewing position.
What Are the Most Common Living Room Lighting Mistakes?
Many lighting problems come from positioning rather than insufficient fixtures. Review your existing arrangement before buying more lights.
- Relying on one ceiling light: Add separate task and accent sources.
- Using exposed bright bulbs: Choose suitable shades, diffusers, or different angles.
- Ignoring reading areas: Position task lighting close to the activity.
- Mixing unsuitable color temperatures: Coordinate bulb colors where consistency matters.
- Overlighting decorative features: Highlight fewer objects with more intentional placement.
- Forgetting dimmer compatibility: Check the bulb, fixture, and control specifications.
- Creating unsafe cord routes: Keep cables outside walkways and away from potential damage.
Also check fixture wattage limits, voltage requirements, and ventilation instructions. Hire a qualified electrician for hardwired installations where required.
Example: How Would You Layer Lighting in a 12 × 15-Foot Living Room?
Consider a rectangular living room with one sofa, a reading chair, and a television. A simple layered arrangement can support several different activities.
Here’s an illustrative starting plan:
- Main ambient source: A suitable dimmable ceiling fixture with approximately 1,600 lumens of total output.
- Reading corner: An adjustable floor lamp with an appropriate 800-lumen bulb.
- Sofa area: A shaded table lamp with a 450-lumen bulb.
- Accent feature: A small adjustable picture or shelf light.
- Independent controls: Separate switching or dimming for the general, reading, and decorative lighting.
These outputs are examples rather than a guarantee of comfortable room brightness. The right arrangement depends on fixture efficiency, placement, finishes, and personal preference.
Test one source at a time after dark. If a corner still feels unbalanced, reposition an existing fixture before adding another.
Which Products Help You Layer Living Room Lighting?
Choosing the right equipment becomes easier when every purchase has a specific job. I’d prioritize an adjustable reading fixture, a flexible light source, and dependable dimming controls.
These three products address different parts of that plan. Customer ratings below are retailer-reported and may change.
Affiliate disclosure: This article contains qualifying Amazon affiliate search links. We may earn a commission from eligible purchases at no additional cost to you.
Best for reading corners
IKEA RANARP Floor/Reading Lamp
★★★★◐ 4.5/5 — IKEA customer rating
This adjustable floor lamp has a directional metal shade, movable arm, and weighted base. The U.S. version uses an E26 bulb, sold separately, with an 11W maximum. I like its flexible design for directing useful light toward a reading chair without replacing ceiling fixtures.
Best for flexible smart lighting
Philips Hue White and Color Ambiance A19
★★★★◐ 4.5/5 — retailer customer rating for selected 60W-equivalent model
This smart LED bulb offers adjustable brightness and white-light color, plus decorative colors. The common 60W-equivalent A19 version provides approximately 800 lumens. I would consider it when one lamp needs different settings for relaxing, socializing, and accent lighting.
Best for plug-in lamp control
Lutron Caséta PD-3PCL-WH Lamp Dimmer
★★★★★ 4.8/5 — Lowe’s customer rating
This U.S. 120V plug-in dimmer can control up to two lamps using compatible dimmable bulbs. It supports up to 100W total of approved dimmable LED lighting. I prefer this type of control when existing lamps need convenient brightness adjustment without new wall wiring.
Check product dimensions, electrical voltage, and regional availability before ordering. Smart bulbs generally require their supported control method rather than an ordinary external lamp dimmer.
Frequently Asked Questions About Layered Living Room Lighting
How many lights do you need to layer a living room?
There is no fixed number of fixtures. A small living room may work well with three useful sources: an ambient light, a reading lamp, and an accent light. Larger rooms often need additional fixtures for separate seating areas. Prioritize coverage, comfort, and controls over fixture quantity.
What is the best color temperature for layered living room lighting?
Warm-white lighting around 2700K–3000K is a good starting point for many living rooms. The lower end looks warmer, while 3000K appears slightly cleaner. Use adjustable bulbs if you want different settings for relaxation and detailed activities. Test the color against your actual furniture and walls.
Can you layer lighting without recessed lights?
Yes. Recessed fixtures are not required for effective lighting layers. Combine a suitable overhead fixture or uplighting floor lamp with reading lights and subtle accents. Portable lamps and plug-in fixtures make this approach especially practical in rental properties where permanent electrical modifications aren’t possible.
Should every living room light be dimmable?
Not necessarily. Dimming is especially helpful for general and decorative lighting because these layers support different moods. A dedicated reading lamp may only need reliable on/off control. If you choose dimming, confirm compatibility between the bulb, fixture, and control before installation.
How do you make a living room feel cozy with lighting?
Use warm-white bulbs, reduce direct glare, and spread gentle illumination across multiple locations. Combine a softly lit background with useful reading light and one restrained decorative accent. Dimmer controls can help create a relaxed evening atmosphere without leaving the room completely dark.
Final Takeaway: How Should You Start Layering Your Living Room Lighting?
The best layered lighting arrangement starts with how you use your living room. Add ambient light for general visibility, task lighting for useful activities, and accents for visual interest.
Keep brightness adjustable where practical and coordinate the light color across fixtures. Choose placement based on your furniture, not just the room’s symmetry.
Start tonight: Turn off your main ceiling fixture and switch on two existing lamps in different locations. Sit in your usual seat, check the shadows and glare, and reposition the lamps until the room feels more balanced.
That simple experiment can reveal what your living room actually needs before you spend money on additional lighting.